Showing posts with label Cooks. Show all posts

Tuesday, August 27, 2013

Kill It With Fire, Part Five: Cleaning the kitchens. . . summary and wrapup


"Cooking is a craft, I like to think, and a good cook is a craftsman -- not an artist. There's nothing wrong with that: the great cathedrals of Europe were built by craftsmen -- though not designed by them. Practicing your craft in expert fashion is noble, honorable and satisfying."

- Anthony Bourdain, Kitchen Confidential
No one begins something like this on a whim. And if I'm honest, the quote that started this insanity was just one of many pebbles that contributed to the avalanche. It might have been the first pebble, but I can hardly blame Mssr. Bourdain for all that followed...

I am tired. More tired than I have been in a long, long time. My new regimen of archery practice didn't help, and for my Elizabethan alter-ego, the invention of Advil is 390-odd years in the future.

Thankfully, I live in that future so I'm not reduced to gnawing on the trunk of the nearest willow tree.

I was an art major, which is a roundabout way of saying that I spent a lot of time working in restaurant kitchens. There wasn't much in Bourdain's book that really surprised me. Of all the oddball jobs I took through the 'starving artist years' that are so fondly spoken of by people who've never lived through them, the restaurant jobs were my favorites.

Was it noble, honorable, and satisfying, as he promised? I dunno. I wasn't a chef, the highest I ever got was prep cook. I certainly didn't make it to culinary school; I spent too much time as a dish dog, really. Nevertheless, the exposure to finer foods and the people who prepared them than I could afford on what they were paying me taught me to appreciate, to taste, food differently.

But this isn't a foodie blog any more than it's intended to be Scottie Goes to Ren Faire. I never really meant for the baking demonstrations at the Washington Midsummer's Renaissance Faire to change so drastically how I thought about this project.

I'm still slightly ashamed to admit that it didn't occur to me earlier to set up and attempt one of these trades at anything close to full production level.  How could I ever hope to understand the lives of my craftsmen forebears if I never stepped fully into their shoes?

We'll get to shoes soon, this is about... I almost said it's about bread. It's actually not at all about bread.  Anthony was right about that. It's about craft.


The WMRF demonstrations were always intended to be a sort of safety valve on this project. The faire was scheduled just past the midpoint in the project and I knew that by that time I'd have a fair idea whether or not I thought I'd make it by the end of December. (Though to be honest, I still don't know and you'll see why I've stacked projects as I have in the coming months.)

Like archery, baking was not something I ever thought to enjoy. In my home, I do all the cooking, but The Engineer did all the baking. Baking was too fussy for me, too much like science and not enough like art... or so I thought. It never occured to me that it would be baking that finally put me over to the noble, honorable, and satisfying side of the kitchens.


Those are The Engineer's hands in that photo above. It was also the first time in quite awhile that she and I cooked anything together. Until the recent remodel began, our kitchen was inhospitable to more than one person at a time.

There's finally room for craftsmanship. 

Photo & Digital Manipulation by Dan Hill - © 2013 Used with permission
By God, Tony was right about that. When Dan Hill posted that photo manip above, one of the first comments posted below it (by someone I have never met, mind you) was two words: "Naturally happy."

Bourdain spent the rest of Kitchen Confidential talking about how dog tired he got working the line, how strung out he was on various substances, how much the food business was a scam and how much was genuine, and how arduous the restaurant biz is is, but even now you can see in his shows how much he loved it.

I'm starting to feel that way about bread and baking.

Baking turned out to be more art than science, not as slavishly dedicated to the arcane formulae of moth-eaten texts as I once believed. When my hands were in the dough and our friend Becky had the ovens blazing and Kristin was scooping flour into the bowls while Becky's husband Douglas was working the rope line, charming the tourists with his English accent and well-rehearsed dialogue about the history of English baking... here was an element of jazz. 

And always the crowds lined up at the edge of our area, asking questions and carrying away my card or the address of this blog scribbled on a bit of paper. At one point, we scrawled a diagram and the URL for this project on a chalkboard and folks were taking photos of it with their phones.

I hope you found your way here without any trouble. I hope that you learned something that day at the faire when you stumbled across our mad adventure in the land of yeast and flour. God knows that we certainly did.

That Corgi was an excellent student...

The Oven's End...

The oven at the Washington Midsummer's Renaissance Faire site was never meant to last. Not only did we build it from the cheapest materials, we taxed them to their uttermost extremes. By the end of the last day of the fair, the cracks were no longer superficial. The ceiling and the framing around the door were beginning to deteriorate and I decided to bake a few final pies and call it a day.


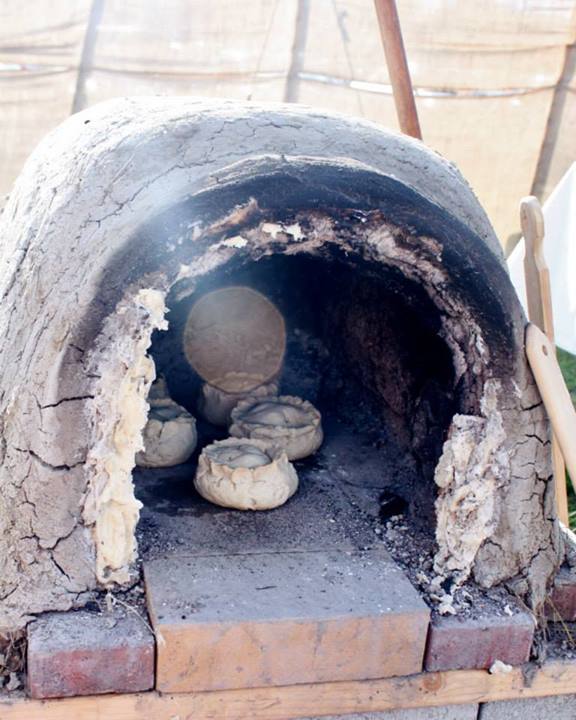
We let the oven cool and went our separate ways to enjoy the fun and frivolity that we'd missed the other weekends of the faire due to tending our breads.  When the final cannon sounded the end of the faire, we gathered one last time around our hearth...

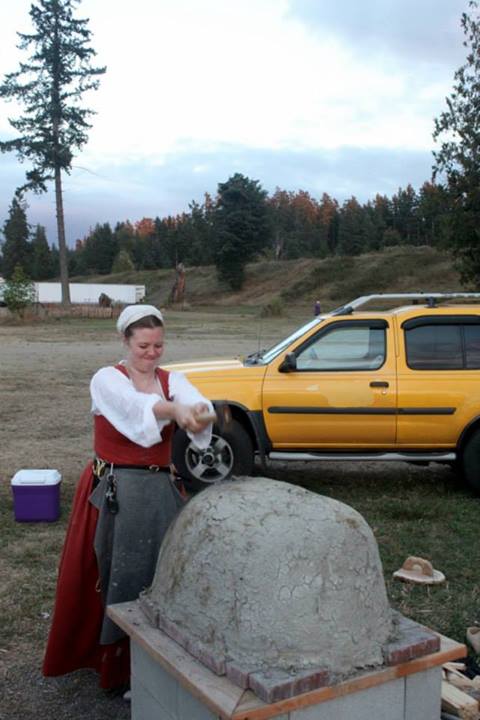
The Engineer had the honor of the first whack.


Then Becky and Douglas, who were so eager to leave they were already changed into civilian clothes...


Then it was left to me. It felt a little wrong, like putting down a family pet. It had stood us in good stead, generated far in excess of its capacity and kept going strong. But the heat and desolation of the days standing in front of it got the better of me and I let the hammer swing.


And soon it was all over.  It arrived at the faire site in buckets and would leave by the shovel full, loaded in the bed of my truck...


The final tally for our little wood-fired bakery: 220 loaves, eight pies, nine scones, two loaves of soda bread, and 1 apple tart, utilizing 1/2 bushel of apples, 80+ lbs of flour, and several gallons of ale. 

Thanks to my partners in floury crime: Kristin Perkins, Kelsey Fahy, and Becky & Douglas Norton. Thank you to Pat, Tracy, and Amy of the Washington Renaissance Arts & Entertainment Society (WRAES) and all the cast and crew of the Washington Midsummer Renaissance Faire.  I hope you enjoyed the bread we dispersed to your tables each day from our bakery.  Thank you to all the photographers that documented the events and kindly sent me their photographs and videos.

There is, as always a sense of melancholy as we end one thing, and a sense of hope as we embark on the next.
Stay tuned to this channel. I doubt this is the last time we will see the fruit of an oven such as this. I still have the one in my back yard, after all...

~ Scott

Monday, July 22, 2013

Simple Simon met a pieman, going to the fair...

As previously noted, this past weekend an old back injury flared up (cough-anvil-cough) and I was a bit stuck. I couldn't sit down and got tired of laying down, so I decided to do some food-borne experiments standing at the counter.  An excellent opportunity to explore the cuisine prepared for the high and the low by the Worshipful Company of the Cooks of London. After poking around the internet (the cookbooks were on a shelf too low to reach, something I'll need to address soon) I settled on making a classic pork pie.


Except that no one on the web could seem to decide what that meant.  Which is perfect territory for me because I never know what anything means until I get there.

Thankfully, enough of the kitchen is done to give me some space for my lab equipment, but which I mean a notebook and a laptop.

What I like most about this is that it gives you a sort of mid-race look at how things work in behind the scenes. First I look to see if anyone else has done this before. If so, what did they do? Do I like what they did? Can I do it differently, or better, or in some way contribute to the discussion in my own way? Has it been done to death? Is there a better project?

Then I begin to experiment, carefully recording my results and noting where I deviated from the standard profile. Note taking is of paramount importance. I lost my notebook with all my notes on the history of brewing and it quite literally set me back a month on that project.

To quote Adam Savage from the Mythbusters: "Remember kids, the only difference between doing science and screwing around is writing it down."

So... pies.

I know going in that pies were often used as simple ways to create fare for the working stiff. Which is right up my alley. A pie wrapped in cloth will stay hot for quite awhile after the working stiff gets to his workshop, a portable hug from his family kitchen. Pies were served to all walks of life, differentiated mainly by the expense of their ingredient list.

My cupboard holds enough spices that to the 16th century cook it would seem that I'd purloined a king's ransom, so I must be careful. I want an upper-middling sort of pie, perhaps around a festival time when purse strings were loosened by gaiety or in hopes of impressing an important client. The clove and cinnamon especially come to us from the far Orient by way of many middle-men, each taking a cut of the high price I paid to show off the wealth of my kitchen... all six square feet of it that are finished enough to be in the photos.

Yes, pain and painkillers do make my imagination run a bit wild, but as long as I don't hurt anyone, who does it hurt?

After a bit of trial and error, I cobbled together the following working recipe for a spiced pork pie in a standing coffin, complete with photos of carefully-staged food (which was weird for me, because I'm not the Instagram breed of foodie).  Though I use some spices that would cost our Elizabethan cook a pretty penny, the nicest thing about a pie is that it's a scalable application and could easily be made for more money or less depending on what you put in it.

Hang on... you put what in a coffin?

A coffin is a period term for a pie crust and in general they were edible but not necessarily meant to be eaten. It's a curious bit of nomenclature and it illustrates handily the gallows humor of a people who lived much closer to the line between life and death than moderns like myself are accustomed to. When I can reach my Oxford English Dictionary (too heavy, too low of a shelf... now I know why dictionary stands were invented) I'll try to figure out whether the box for dead people or the crust for a pie was named that first.

I sort of like the idea that it was the pie first.
Please note: Bad back means no chopping wood, so this one's done in the modern oven inside, but would easily translate to the wood-fired oven or to baking in a cauldron placed next to carefully-tended coals. I really should find myself a couple of apprentices...
Let's get cooking!

To make a simple pork pie in a standing coffin

Serves: 4 (Makes four pies)


Coffins...
3 cups of flour
2 tsp creme of tartar
1 tsp baking soda
1 tsp of salt
1 cup of water
8 tbs lard
2 tbs unsalted butter


filling...
1 lbs ground pork (plus reserved liquid)
1/4 cup chopped onion
1/4 cup bread crumbs
1 tbs spice mixture
     cloves
     allspice
     cinnamon
     black peppercorns  
6 cloves of garlic
pinch of salt
1/4 tsp flour

Additional...
One egg, beaten

Making the coffins...

Combine dry ingredients in a work bowl using a sieve or whisk. Make a well in the middle of the mound of dry ingredients.

Meanwhile, heat the lard and butter with 1/2 cup of water to a boil. Remove from heat and wait for it to stop bubbling, then pour slowly into well in the dry ingredients. Begin to combine the hot wet mixture into the dry using a wooden spoon, working outward from the center, being careful because the wet ingredients are just off the boil. Sieve additional flour as needed until your paste takes on the consistency of Play-do.

Turn out onto a floured board and divide into six equal parts. Use a rolling pin to flatten into disks about a half inch thick and stack the disks with waxed paper between them in an open bag.  Counter for at least four hours or move to the refrigerator and chill for at least two hours. (If you decide to chill, bring to room temperature before you start to work the dough again.)

Making the filling...

Your spice pack is basically mulling spices minus the star anise. (The licorice flavor of anise overwhelms the pork in my opinion.) Candied ginger or orange peel is a delightful addition if you get a whim. Combine the spices in a mortar and pound into powder. If you must use an electric spice grinder, I won't judge you.

Well... maybe a little.


Combine spice pack, onions, garlic, salt, and ground pork in a pan and cook on medium heat until it starts to come together.

DO NOT DRAIN.

Once the pork is brown, mix in bread crumbs and a 1/4 teaspoon of flour to thicken the drippings.  Set aside to cool and congeal. Yes, congealing is a Good Thing.
Deviation from the norm: This gets pretty thick, but it makes a rather loose filling by meatpie standards. In traditional pork pies, you would often make a gelatin by boiling down trotters (read: pig feet) and then combine that to make a filling that could stand up on its own. For a modern approach, you can substitute unflavored gelatin, which you use according to the package instructions.
Preheat oven to 350 degrees.
If you are baking these in a wood-fired beehive style bread oven like mine, these are introduced in the baking sequence after the bread is finished cooking.

Raise the coffins...

When your crust dough has aged, allowing the fats and the proteins to form a strong melange (and it's back to room temperature if you chose to refrigerate) roll out the first disc on a floured board. Place a pie mold in the center of the dough disc and begin to smoosh the dough up the sides, forming a little bowl.
On the subject of pie molds: Pie molds are not often seen these days in even the best stocked kitchen store. Anything cylindrical will do. I've seen everyone including some very serious reenactors do this with an ice tea glass. I use a 4-inch cut from the middle of a thrift store rolling pin. This is the cheapest source I could find, short of turning one on a lathe and even then the raw materials would cost more than Goodwill's old rolling pins. Just remember to grease the mold so you can get it out.


Whatever you choose to use, raise four coffins in this way, making what amounts to four tall, doughy ramekins, leaving two rounds of dough on the board. The bottoms of your coffins should be at least a 1/3 inch thick and the walls should be sturdy at the bottom and taper at the tops.

Divide each of the remaining disks in half and flatten into thin rounds with your rolling pin to make lids. Scoop a bit of the filling into each, mounding the middle, but leaving the lip clear. Smear a bit of beaten egg around the inside lip and lid them up, pinching the edges decoratively if you so choose.  Be sure to cut vents for escaping steam or the coffins will get gooey instead of staying sturdy.

Add a bit of water to your beaten egg to make an egg wash and slather the tops liberally with the egg mixture.

Bake for 30 minutes or until the tops are golden brown and flaky.

Serve hot or cold, alone or with a nice salat (that's a "salad" to you and me) and a complementary beverage. For my part, I like any nice amber ale that I had nothing to do with brewing.


Saturday, July 13, 2013

Kill It With Fire Part Two: Time to eat your beer...

I have to admit something before we begin... I'm not a baker. Bread is as near to kitchen magic as anything I've ever seen.  It's something my mom did so easily yet seems to complex that it's always freaked me out a bit even when the most complex kitchen procedures fell before my mighty spoon.


I own scores of books about breads and I aspire to being known as a baker, but I never actually bake anything.  It's just so fiddly and I always have some other Thing that Needs My Attention Right Now.


That changes today.  And because I can't do anything normally, my first loaves of bread ever will be in a wood-fired oven made out of cat litter.

Yes. Cat litter.

It was clean when I started, honest. But we'll get to that in a minute.

You are, by now, familiar with that photo of the empty plinth in my back garden that I have posted a time or three in hopes that doing so will inspire me to put something there... preferably something oven-shaped.

It finally worked.

My old nemesis Jost Amman was an enormous help this time around, with his picture of the half-naked baker at his work.  (Call me crazy; I decided to do this fully-clothed.) Bread ovens the world over are made in essentially the same way. A dome of clay mixed with sand and straw is formed, and when dried it is heated with a fire. This simple style was in use in Pompeii and was still in use in an essentially unchanged form in colonial America. Without driving more than an hour from here in any given direction, I can reach at least ten restaurants using the same technology as our ancestors did to bake pizzas. Some of them cheat and use gas to heat them, but there are a good many that still use wood.

Some technologies are just built to last.

The principle is simple. Clay is a natural heat sink, an insulator that stores heat that it pushed into it by a kiln or by a wood fire. This makes ceramics possible. It also makes it possible to use that "heat sink" property to cook food by adding heat and then using the stored heat after the source is removed, in this case a wood fire.


Apparently, the island where I live used to house the Pacific Northwest's largest clay quarry. This should be a blessing since most of that clay went into the bricks that built Seattle. It's not a blessing, though, because apparently they scooped it all out and carted it away, leaving me wanting for clay when it came time for building ovens.

The closest, cheapest, most readily-available source of clay? Cat litter. The stuff they sell in the bulk bins at my local pet store is almost pure clay and it's less than ten bucks for thirty pounds if you have a coupon.

I used a book called Build Your Own Earth Oven by Kiko Denzer and this video from Jas Townsend that is based on the same book.


They have another video on their YouTube channel showing them building a quicky version using cat clay. Mine is a melange of both methods the base method in this video and the quicky version, all based on reading Denzer's book.

It takes up to two hours to get it fully up to heat.  Which is handy since most breads need that much time to rise.

Eat your beer/Drink your bread

My sources don't agree on whether or not soured dough was a Thing in Elizabethan bakeries. And those who say it was don't cite their sources. I honestly thought it was, because it seems so obvious to me and I can find plenty of sources dating the procedure back to the ancient world. One thing I know for certain is that yeast was available for purchase from brewers, who scooped it from the foam that forms atop fermenting ales. The foam was called "Barm" (from Old English "beorma" meaning 'yeast', and the common root of the word "Barmy" meaning goofy... I just couldn't make this stuff up if I tried.)
My ale just isn't barmy enough...

As it happens, I have a batch of fermenting ale... that isn't very foamy.

Bother.

Thankfully, I know how to cheat because the same wonderful folks who posted those bread oven building videos also posted some videos about using their ovens. (Honestly, their cooking videos are not to be missed.) And along the way, they gave some tips on how to fake ale barm using a bottle of modern ale, some ale yeast, and a bit of agitation.

1/2 cup warm ale
1/2 cup flour
1 packet of yeast

Mix well.

I mixed mine in a mug. The guy at Jas Townsend mixed it up in a bottle, probably because it made for more interesting video footage.  Just remember to account for that flour and moisture in your recipe.

Bread recipes for the period are frightfully simple. Flour of various sorts, water, a bit of salt, and yeast. Most of the things we add to bread today to change crumb structure and density and whatnot are perishable and therefore seasonal for the Elizabethan baker. A professional bakery probably had better access to all ingredients, but for a loaf meant to be sold at the palace. Our bread is of the middling sort, so it will boast only one extra ingredient to suit my fancy: honey.

A confession the recipe I used as the basis for my first loaf was the Basic Whole Wheat Bread from the Laurel's Kitchen Bread Book by Laurel Robertson, et al.  It's a fantastic loaf of bread, dead simple, and she has a wood-fired oven in her home, all of which are points in her favor.

Also, it's as close to the period recipes I have onhand as any other and I needed something basic to start me out. So thank you, Laurel and your kitchen.

I keeping with my imaginary middle-class loaf, I won't be using white flour, which in the 16th century would be achieved by 'bolting', which is the act of filtering flour through increasingly finer cloth until all of the chaff and germ are out of it and only the endosperm remained. These days, we use chemical processes to whiten flour, so I don't generally eat the stuff anyway.

6 cups (900 grams) of whole wheat flour
2 teaspoons of salt
2 1/4 cups lukewarm water
2 dollops of honey
Jas Townsend Cheater Barm 

Sit the water and honey atop the warming oven to dissolve the honey into the water while you scoop your dry ingredients into a large wooden workbowl.  Make a well in the center and add your warmed water/honey mixture and your barmy concoction.


 Get your hands in there and start to bring it together into a dough. It will be sticky.


Turn it out onto a floured bread board and knead for up to twenty minutes or until the dough has absorbed all the flour it's going to.


Split in twain and let rest under a towel in a warm spot under a rhododendron or apple tree (which is totally period, right?) and leave it alone for two hours. 


Seriously. Leave it alone. Don't even peek at it. Go put the kettle on and make yourself useful while the yeast do their thing.


When the bread's risen and the oven is heated up, it's time to work quickly. No time for lollygagging or posing for pictures. Use a hoe or something to rake the coals out of the way and give the floor of the oven a good mopping with water. 


 Much sizzling will occur; that's okay, it helps the bread form a goodly crust. Flour your peel and transfer your risen dough balls to the oven, quick like a bunny!  The longer the door is open, the more heat you lose!


Take that door you made yesterday with the handle made from a re-purposed curtain rod holder (waste not, want not) and get it in place, sealing around the edges with a paste made from flour and water.


Wait twenty minutes. No peeking! Just let it bake.  

When the cell phone timer goes off (or your perfectly-period hourglass... um... beeps) it's time to remove the bread.  The paste caulking might still be gooey. That's okay.


Pull them out and flip 'em over. When you knock on the bottom, it should sound firm, but a bit hollow. That means they're done. I don't know why, but it does and they didn't have things like instant read thermometers and toothpicks to test these things.


Note to self: The surface of a bread peel is not a high-friction surface. You almost dropped two loaves in the dirt because you were getting cute with it. Move slowly and don't be barmy.

Find a bread knife and don't cut yourself. Bloody bread is not good eats.


Smear with a goodly portion of butter and enjoy the taste of your fragrant, crusty, and just slightly chewy, beer.


Friday, July 5, 2013

Kill it with fire: The Worshipful Company of Cooks, Part One

The smallest of all the Livery Companies had to be the Worshipful Company of Cooks of London. Yet they did exist, so while the clay bread oven I just built is curing (more on that later) we get an excuse to play with food and fire in their name and I get to try my hand at some period recipes.

I've really been looking forward to this one.

If nothing else, this project gives me a chance to post an image from Bartolomeo Scappi instead of my muse/nemesis Jost Amman for a change. Scappi (died 1570) was the personal chef of six popes. His renown, however, is mostly for his magnum opus: Opera di Bartolomeo Scappi, Maestro dell'arte del cucinare, divisa in sei libri (roughly: "The Work of Bartolomeo Scappi, Master of the art of cooking, in six volumes"). Scappi's Opera (as it's known) is at once a gossipy memoir of life as the Vatican chef and a manual of instruction for the state of the culinary art, circa 1550-1570. It contains over a thousand recipes/preparations, and is probably the most thorough accounting of the renaissance kitchen that we have available to us.

It also includes a large number of drawings depicting kitchens both inside and outside and all the implements that one could hope to reproduce. Best of all, you can download it free from the Internet Archive. http://archive.org/details/operavenetiascap00scap


Scappi, unfortunately, was decidedly not English. So we'll be using his 'Opera' as one of many resources as we work from period or near-period English recipes wherever possible. Additionally, we'll be using some of the resources produced by the fine folks who put on the cooking demonstrations for the Historic Royal Palaces. Between Scappi and the fine folks at HRP, I think we're in good hands.

But before I get to all that, I have to learn to cook with fire.

Looking at that engraving up there, it seems simple enough:
  1. Light fire. 
  2. food over roaring fire. 
  3. Eat and repeat.
But nothing is ever as simple as it seems at first blush. If this project teaches me nothing else, it will teach me that.


Can you hear me humming "Smoke gets in your eyes"? 

Yeah...

A word about cookware and safety...

The Elizabethans didn't know a thing about bacteria or food poisoning. Their grasp on metallurgy was
pretty good, though, and getting better all the time. Yet they used some metals and alloys with furious abandon that we now understand to be catastrophic to your health. They practically poured lead on their breakfast cereal.

Lead isn't really a relevant worry here since its use is so constrained in modern manufacturing. The place most Elizabethans encountered it was in the glazes of their ceramics and as a potter I can control for that pretty easily. My main deviation from the period is eschewing bronze entirely. Those cauldrons you see in all the paintings? Most of them were cast in the same manner as church bells and from mostly the same materials.

The biggest problem with bronze (aside from weight and expense) is that it's an alloy mostly consisting of copper. In the period it might be blended with lead or zinc, neither of which are good eats, but even modern bronze has its problems and perils. 

I use copper all the time because I have some copper cookware in my kitchen and it tends to be lined with tin if it's intended for household use. But all my cauldrons are cast iron, which is most assuredly not a period metal. Why the deviation? Because cast iron is easier to clean and care for, less expensive, and even if I screw up completely, it won't poison anyone.

Is that really a danger? Sort of... certainly more of a problem than I'm willing to bear on my conscience. When copper comes in contact with acids it can create a chemical reaction that forms what's known as verdigris.  That's the green patina that forms on copper as it weathers. And it's poisonous.

Scrupulous cleaning can keep you safe and the folks at Hampton Court Palace use bronze cookware that was made for them (I believe) by the folks at Historic Castings.

Thermal mass is the key here. As far as I can tell, the choice of metals for my cookware doesn't change the results and the transfer of heat from fire to food doesn't change all that much.

Speaking of cleanliness, I have pots to clean...

More later.

- Scott

Sunday, February 3, 2013

Calculations, Coopering, Cats, and Cooking: Current events

Sorry I've been remiss this week. All of a sudden, there are a lot of balls in the air and I'm rushing to catch as many as possible before they hit the ground.

Calculations:

The Engineer doesn't want you to think she can't figure out the inside angles of a polygon. She just didn't see the point in giving me the answers.

Can't just tell me the answer, oh no, that would be cheating. I manage a tutoring center for a living. Math people. Go figure. Like any good teacher, she helped me get there on my own.

I should have known better than to think I could get out of this without learning some math.

Anyway, I've decided that there are eight staves in the tankard I'm making, so that makes it an octagon. Thankfully, this chap named Euclid wrote some books on geometry way back when* and that shifts things into the realm of history. Which moves the ball back to my side of the net.
The formula for determining the interior angle of a regular polygon is simple enough. The number of sides minus 2, times 180 and then divided by the number of sides. (No, I didn't know that, I looked it up.) That gives you 135 degrees.

Then, as any woodworker can tell you, you halve the angle to determine the angle of your cut. The bevel on each side of the stave for an eight-piece bit of coopering is 67.5 degrees.
So there.

Then I Googled it to check my work and discovered a lot of websites where I could just type all those variables in and let it figure it all out for me. Seriously. How do people not pass math classes these days?

*Note: Whatever it might normally mean, "Way back when" is now officially 300 BC. Just so you know.


Coopering:

In the meantime, in case you missed the post yesterday, I'm hard at work making that stave tankard I was calculating earlier.

Here's an article about another one of the same sort that was found in the mud along the Thames by a mudlark. These things are pretty big by modern standards. According to the article, it holds three pints. The Mary Rose one I'm basing mine on holds 8 pints, probably as storage for a sailor's beer ration.

Unless I'm way off, I calculate that mine will hold roughly two pints.


Cats:

We've adopted a new 9 month old kitten from the Tacoma Humane Society. Our other two cats are boys and The Engineer was feeling outnumbered by all the Y chromosomes. Also, one of our cats will turn 15 years old this year and he's slowing down a bit. Which means the 7 year old -- who is naturally runs in the neighborhood of 25 lbs anyway -- is getting torpid because he doesn't have an active sibling to play with.


Ladies and gentlemen, meet Cleo. She's our newest family member and I'm sure she'll be in charge in no time at all. 

Cooking:

In my bio I say that I'm not a reenactor or a member of any of the reenacting groups. And that's true, but it's not for lack of trying. Long ago, I attempted to create a group of my own, centering on Renaissance foodways, centered around a guild of actors at the Washington Renaissance Fantasy Faire.

We called ourselves Saint Brigid's Hearth, named so in honor of a dear friend.

The reality of setting up and creating a reenactment troupe was a bit more involved than I gave credit for. It was rather like setting up and running a small business.  The from-scratch nature of this meant building more or less from scratch, beginning with costume and characterization.

In short, the acting concerns outweighed the reenacting concerns.  That was a number of years ago and in the interim, the ren faire where we originated fell and a new faire arose to replace it. I pressed the guild into other hands and moved on to other things as they continued as an acting troupe for awhile before fading away as Real Life Concerns drew the attentions of the actors and the guild went dormant. 

That's when serendipity took over: I conceived of and began this project.  A project that will include cooking, baking, brewing, bricklaying, and other things that will be of concern to the craftsmen who built and used the kitchens of the renaissance.

Over the course of the past few months, I've been in negotiations with the Washington Midsummer Renaissance Faire to revive the group as a proper reenactment society. To build a period-appropriate kitchen on the faire site and do cooking demonstrations. To make history entertaining and trick people into maybe learning something.


This week, the last of the i's and t's were dotted and crossed (not everything in this post can start with a c...) and I turned in the final designs and addressed the fire concerns for the wood-fired bread oven. So the Renaissance Artisan will team up with St. Brigid's. The prototype oven will be built in my back yard as part of this project, and then in late July we will duplicate it on the faire site.

"Because he needed something else to do?" is probably what you're saying, but there's nothing in the presentation of foodways to a ren faire crowd that I'm not already going to be saying to you.

And I'm not going to be doing it alone.

It's going to be more than just "The School of the Renaissance Artisan in front of a live studio audience" because St Brigid isn't about me. It's about providing a community of and for other people with the same aim as me: to celebrate the workaday peacetime world of renaissance England.

Tuesday, September 11, 2012

Planning ahead: A Bread Oven

A lot of this project is going to involve planning ahead to have the facilities set up to do the tasks I need to perform in order to check something off my list. One of the things I'll need is a place to perform cooking and baking and the first step on that road is building an oven.

A wood-fired oven, to be exact.

I have no affiliation with these fine folks, but I am a big fan of the wares sold by the historical wares sold by Jas Townsend and was delighted when a friend sent me this video, along with the many others they've put up in a series dedicated to breathing life into a kitchen of the 1800's.

More after the video...


It is interesting to me that cooking changed so little between the 14th century and the 19th. The Jas Townsend folks concentrate in the 1800's, but the oven they made in that video would be right at home in any renaissance village.

This is, essentially, the oven I am planning to build in my back garden.  (BTW: I checked with The Engineer and she's cool with it because after the project, we'll use it to make woodfired pizza. Ohhhhh yeah.)

But before I can start planning any pizza parties, I have to build the darn thing.

Project List:

  • "Shed" roof to protect the worksite from the Washington rains.
  • Source refractory brick for the base.
  • Sourcing clay, sand, straw
  • Building the oven.

Sourcebooks: 
English Bread and Yeast Cookery by Elizabeth David

Build Your Own Earth Oven, 3rd Edition by Kiko Denzer
The Bread Builders: Hearth Loaves and Masonry Ovens by Daniel Wing

Various baking and recipe books.