Sunday, December 1, 2013

Now What? The evolution of the project...

Today is December 1st. The state of the project? It is to laugh...

I've been very sick since the end of September. I have this stupid... thing that happens to me periodically. Around here, we call it Sporadic Lego Head Holiday Syndrome. We call it that because it's apparently un-diagnosable by modern science. Perhaps the dumbest assumption I made at the beginning of this year was that I'd be able to stay healthy for the entire year so that I could complete the rather daunting task list I'd written for myself.

All that is somewhat beside the point.

The brief interstice moments the past couple of months, I've spent working on our kitchen. Because family comes first and I keep my promises to others before I keep the ones I made to myself. So I have a functioning kitchen and a non-functioning artisan project...

I'm proud of the work I've managed to finish on the kitchen, but the "One Year Mission..." part of this blog has not fared nearly as well.

Have I failed? 

It would be difficult to argue otherwise. I certainly can't knock out two dozen trades in the one month I have between now and January 1st. So it would be pretty stupid for me to say I haven't failed at my original mission.

If you feel the urge to say I told you so, please feel free to swallow that urge. Seriously. Don't be that person.

The truth is, this project was beginning to morph into something more long-term long before my head swelled to cartoonish proportions. If I'm honest with you and with myself I began to second-guess the format I chose for this back in August when I experienced the true difference between learning an aspect of a trade and truly practicing it.

Of course, it's impossible to practice 111 trades from 54 guilds at once.  There are valid reasons why tradesmen specialized and it wasn't only because the guilds required them to. The requirements for specialization forced them to focus on a single trade and operate at the top of their game.

So now what?

Yes, I am a craftsman, but I am first and foremost, a storyteller. So I will finish the story.

This story has grown in the telling, as stories are wont to do. With every blister, splinter, burnt loaf, and failed thimble, it has become about more than the making of the stuff and less about the making of the artisan. For the past year, I expended too much effort on the tasks and not enough on the tradesmen.

A story like this deserves all the space it needs to tell it properly. It deserves more than scene setting, it deserves character development. I don't rightly know how that will look, but that's what I plan to do. So my continuing mission is a purer, more thorough version of the original one, but without the artificial time constraint.

I said at the outset that I had a problem with how history is taught, with the People Magazine approach that is a pointless litany of glittering celebrities carrying on, mostly behaving badly. It's no wonder that students view history as a list of dates to be memorized and the names of kings and generals to regurgitate. I found myself doing the same thing on a different level, ticking off a list of items to make and move on to the next.

Material culture is only interesting in how those materials reflect the culture. The tools are only interesting in the way that they reflect their user and their maker. I lost sight of that as I focused on the sprint.

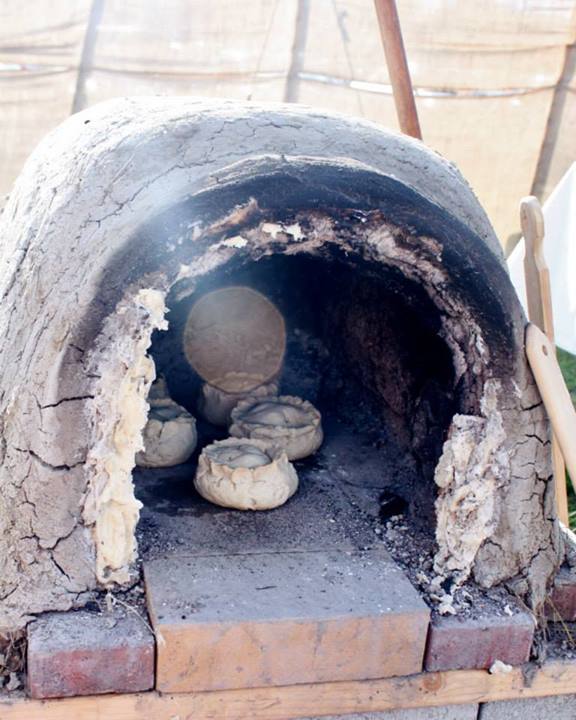
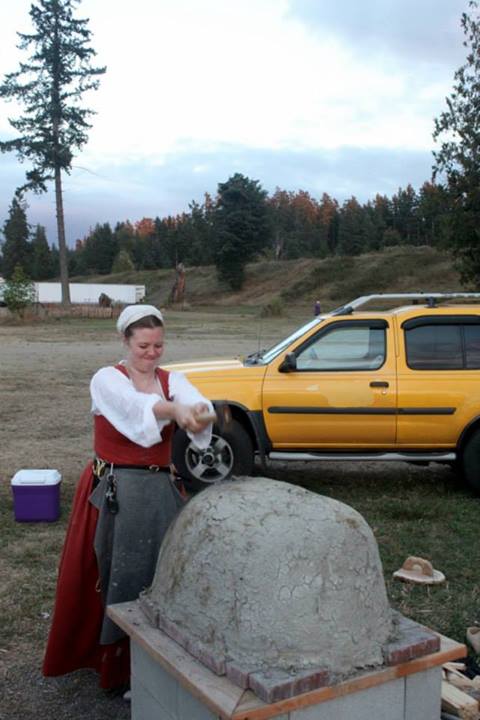
Spending three weeks in the smoke and flour dust of our ersatz renaissance bakery showed me how thin my understanding of these trades was. How superficial the project had become, mostly because I had set an artificial deadline that made it look more exciting from the outside and forced it to become less in-depth on the inside.

By failing, I've set myself free from my own constraints. There's probably a deeper metaphor there for those who have an urge to mine for such things.

In the meantime, I've a story to tell. I invite you to stick around and help me tell it. If you don't, I certainly understand.

~ Scott


Sunday, September 22, 2013

A Joiner's Toolbox: The Hand Plane

If this sometimes feels like a woodworking blog, I apologize. It's not intended that way; it's just that so much of the technology of the 16th century revolved around items made from wood or iron. Often both. 

Despite the fact that modern woodworking has largely become a matter of "He/She who dies with the most tools wins" it hasn't always been that way. In no small part, this is owed to the fact that there wasn't as much unnecessary variety in tools. The tool box if the 16th century joiner was relatively simple. Even today, there's not much you can't make if you have a couple of measuring implements, a sharp knife, a few decent chisels, a saw or two, a hand drill, a nice heavy mallet, a hammer, and a few simple hand planes. (Your apprentice will also need an axe, a mallet, and a froe for splitting lumber as well since you can't go down to ye olde Home Depot to buy it.)

Some details can be found in period sources:
"A Rule a compass a hatchet a hansawe a fore plane a joynter a smothen plane two moulden planes a groven plane a paren chysell a mortisse chesell a wymble a Rabbet plane and six graven Tooles and a Strykinge plane..."  
- From a 1594 apprenticeship contract of John Sparke and Humfrey Bryne, outlining the tools of the joiner's trade. (As quoted in "Seventeenth Century tool kit." Peter Follansbee, joiner's notes (blog). September 8, 2009.) 
If you're engaged in a specific trade, of course, there would be a couple of additional items such as lathe tools or spoke shaves, but there's really not really much variance from that central list.

A small selection from my toolbox...
The primary tool in the joiner's toolbox is the hand plane. Roy Underhill has even said that the difference between a carpenter and a joiner is the joiner's plane. He's right in a very specific way: guild laws actually forbade the use of certain key tools by other craftsmen in order to discourage generalists. For the joiner, the hand plane -- especially the plough plane -- was his identity as much as the lathe identified the turner.

The hand plane is essentially a chisel held in a frame and secured in place with a wedge. Sometimes, there's a handle at the front or back, depending on where and how it's used. They've been around since pre-Roman times and arose independently in cultures cut off from one another as the obvious next step to save labor from smoothing large surfaces with hand chisels and adzes.

The parts of a hand plane (I realized I haven't done a custom illustration in awhile)
The amount of change between the Roman hand plane linked to above to the hand planes that were found in the wreck of Mary Rose (below) and the ones in my wood shop today is very slight. The drawing above could cover any one of them. Most of the changes were matters of metallurgy as the blades got better and better and the chip-breaker was introduced to help alleviate the clogging problems endemic to the old beasts.


It wasn't really until the industrial revolution that any great change in plane technology was introduced and took root. In 1865, Leonard Bailey's patent hand plane changed the plane from the wooden carcass we see in the archaeological record (and my tool chest) to the iron-bodied planes that we see today.


If you've been following along, you've seen this tool before in a far more decrepit shape. It's my recently refurbished Bailey Number 6 with my custom over-sized walnut tote (I have large hands). This is the most common form of hand plane seen in workshops today. My friends might mock me as a Luddite, but even in my focus on hand tools, I'm a mostly modern worker of wood. Iron body planes have it all over the wooden ones in durability and adjustability. They're easier to use, easier to set up, and less finicky by far than their old wooden counterparts. Want to adjust the iron on a wood plane? Grab a mallet. Whack the tail to retract the blade, the front to extend it, the sides to adjust the pitch, and hit the wedge to set the blade... then do it all over again if you get too much or too little. Yet wooden planes are still made today and used religiously by many.

Why?

I wondered that myself until I bought a couple of them from my local antique dealer and put them back into service. First off, they're fun. I can't find a better way to describe it. Also, the weight of the thing does some of the work for you. I've noticed as well that once you've worked out the zen of setting the iron,  they don't chatter as much.

Another thing worth noting is that proper joinery of the period was all done with green wood. None of this kiln-dried nonsense that we get today: Cut down the tree, split it up, and make some furniture! If you try working green wood with iron-bodied planes you're going to have rust problems in pretty short order.

Incidentally, they can also be quite beautiful.

My favorite planes aren't as pretty as the one Robin Wood made (pictured in the link above) but they are elegant in their simplicity.


The fact that these tools changed so little from their inception to now is a blessing of a different sort: We can set up our (mostly) period-correct toolbox without making them. The differences, in fact, are so slight that in his book "Make A Joint Stool from a Tree: An Introduction to Seventeenth-Century Joinery," Peter Follansbee advises buying them and getting on with it. This is because -- other than the addition of a chip-breaker and handle placement -- the wood-body planes I can buy today in any antique store are virtually identical to the tools depicted in paintings, engravings, and other depictions of early modern joiners, as well as the first English-language treatise dealing with the joiner's art: Joseph Moxon's Mechanick Exercises (available via that link as a free download), published in 1694.

We'll be referring to Moxon again, so get used to hearing his name...

~ Scott

Image from Moxon found via Project Gutenberg's scan of Woodworking Tools 1600-1900

Tuesday, September 10, 2013

Waiting for the other shoe to drop...

Some things I learned today:
  1. Wooden shoes are really quite difficult to walk in, 
  2. The Dutch call them 'Klompen' from which we apparently derive the onomatopoeiac word my dad used to describe how I walked across a room. (ClompClompClompClomp...)
  3. Splinters. Ouch!
  4. I have no idea how anyone dances in these silly things. 
  5. "Onomatopoetic" is a real word but sadly doesn't refer to extremely noisy poetry, which is just terrible and wrong in my opinion.

While we're making lasts and getting our joinery act together, let's chat a bit about workplace safety. My new shoes will be many things, but steel toed is not one of them. For safety's sake, let us consider other options in the foot-protection department. Clogs. Or you might call them klompen, sabot, or those whimsical tripod albarcas of Spain. Whatever you call them, wooden shoes are everywhere. (And not just in Europe, but the world. Japan, China, and Korea all have wooden shoe traditions.) All across the the planet, people have spent a large part of the last few millenia using wood to protect their feet.

The fens of Europe were much worse in the early modern period before landowners spent a few centuries draining the wetlands and building dikes and whatnot. So mostly, the wearers of all these clogs were trying to stay out of the mud. However, it's worth noting that I am not exagerrating, apparently the European Union has granted 'safety shoe' status to the traditional clogs.

I wouldn't want to drop an anvil on my foot even if I am wearing a nice wooden clog, but then I wouldn't want to drop an anvil on my foot when I'm wearing steel toed boots either, so... yeah.

Anyway, clogs like the ones I'm wearing above (made, incidentally, in Holland, Michigan) are most often identified with the dutch, but wherever there was mud and offal in the offing, there was wood on someone's feet.

Remarkably, even if these were strictly Dutch shoes (file the point toes off and they'd be right at home anywhere in Europe), it wouldn't matter to us. Why? Well, remember when we were brewing beer? The influx of immigrants and refugees to England made London a bustling and cosmopolitan city. The peoples of the Low Countries (modern day Belgium and the Netherlands) fled religious persecution and Spanish rule in their homeland and brought with them their beer and their pottery and set up shop wherever they could find a bit of space. So even if they hadn't found people wearing clogs and pattens, they'd have introduced them when they got there.

The Worshipful Company of Pattenmakers won't be incorporated until the mid 17th century, so they technically fall outside my project. Which is why we are not going to make a pair. (That and I still haven't found one of those pesky stock knives I was talking about...) Nevertheless, they were around and they were indeed making pattens and overshoes to navigate the muddy streets of 16th century London.

Pattens we will make once we have shoes to strap them to. It gets pretty muddy here in Washington so if I hope to wear these shoes and have them last for more than a season, I'll need to get myself up out of the mud.  To do this, I will strap some wood and leather overshoes to my shoes using the traditional (and blessedly easy-to-come-by) wood of the alder tree.

Honestly, I'd like to see more clogs and pattens worn at reenactment events anyway. Maybe we can start a trend!

Dutch (again) pattens found in an archeological site.
Creative Commons licensed via Wikimedia Commons
We'll talk more specifics about the making and design of pattens when I'm making them. In the mean time, let's take a closer look at my wooden shoes, just for fun...

The Dutch-style clogs on my feet are visibly almost identical to the shoes worn in the muddy byways of the Low Countries since the 14th century. Mine, however, were carved from poplar by an ingenious combination of lathes and very clever industrial tools that have been around virtually unchanged since the 1920's.  You can see them in action here if you are curious.

Our pattenmakers and cloggers of the 16th century had no such access to mechanized luxury. They turned them out on at a time from an alder log using a stock knife and a spoon-bit drill almost exactly as you'll see in this video.


Neat stuff!

More later, as always...

~ Scott

Wednesday, September 4, 2013

The Last Last Post

For the record: I'm won't spend quite this many posts for the second last. However, on advice from Francis, I did go back out to the workbench and spent some more time zeroing in on the correct form of my last. He advised that I raise the sole about a 1/4 inch, sloping from the ball of the foot to the heel. This isn't to accommodate a heel so much as to accommodate the shape of the human foot.

This was done mostly with hand tools this time: the pattern maker's rasp and as I neared my final desired measurements, a spokeshave. I will sand it to remove most of the toolmakrs before putting a finish on it and moving on to the next one.

In the meantime, we're going to shift over and visit the Joiner's shop.  Stay tuned!

~ Scott

A bit of heel lift demonstrated by putting the heel on a handy speed square.

The less-flattened sole of the shoe.
 

Tuesday, September 3, 2013

...and Lasts, and Lasts, and Lasts

So apparently when Francis Class told me that the problem with modern/vintage lasts is that they're not 'flat' he meant 'didn't have a heel' rather than 'as a board'. (So to speak.)

You see, it didn't quite sink in that, unlike maskmaking, when you take the last out of the shoe, you don't cut it out. So there needs to be a bit of wiggle room in the form of a toe and heel rise to allow you to slip the last out of the shoe without stretching and distorting it in the effort.

That makes perfect sense.

Thankfully, in the conversation I had with Francis last night, it turned out I'm not the first aspiring shoemaker to grab a piece of scrap pine and try to turn it into a last. He shared this link to the shoemaking blog Where Are the Elves? Adventures in Historical Shoemaking. This guy turned up an historical last to copy. It's a 'straight last' and I'm making a 'crooked last' but more on that another time.

Also, the sole is generally a bit smaller than the shadow of the shoe. So my last needed to look even less like a shoe and even more like a foot.

I can do that.

Tonight after work I grabbed my patternmaker's rasp (Hand tools FTW!) and spent some time with my last in a vise, re-shaping the sole and putting more of a narrow waist on the new last.


I might have to shape it a bit more but I didn't want to overdo it. It's easier to take off too little than to put too much back. . . or something like that.


Monday, September 2, 2013

Worshipful Company of Cordwainers Part I: Something that lasts...

Don't call them 'Cobblers'. A cordwainer is a shoemaker, a cobbler was actually forbidden by statute from working with new leather. His purview was restricted to repairing a cordwainer's work after it failed. The Worshipful Company of Cordwainers controlled all aspects of the manufacture of new shoes.

Whence came the name? For that, we go straight to the horse's mouth, as usual...
"Those who worked with the finest leather were called Cordwainers because their material came from Cordoba in Spain. They developed a soft, durable goatskin leather known as Cordwain – the very finest leather available – importation of which contributed to the growing prosperity of London. Over a period of time, those who processed the leather formed their own guilds. The shoemakers, however, retained the name of 'Cordwainer'." - From their site: http://www.cordwainers.org

Yesterday I said I knew nothing about shoemaking going in. This is true, though I've done an extensive amount of leatherworking so "nothing" might be a bit of a stretch. My favorite form of leatherworking, in fact, is making leather Commedia Del Arte masks like the one you see below. 

Much like shoe making, masks are made with the leather worked wet and formed over a carved wooden matrix. (If you are interested in maskmaking, click here for a full tutorial I wrote last year). So the first step in making either mask or shoes isn't leather, it is carving wood.

And carving wood is something I understand completely.

First things first, I had a chat via email with Francis Classe, historical cordwainer extraordinaire and all around nice guy. He's been very helpful and supportive all along, providing not only advice, but photos and links to things he'd written as well as books of historical shoe making. Francis works with modern wooden lasts that he modifies for a period shape.

I like woodworking and I have some carving tools that haven't been taken for a spin in far too long, so we're going to make our own. (This is not to be confused with the fact that I have a size twelve foot and couldn't easily find a modern last to modify. Nope! Not at all.)

Seriously though, I shake my fist as these hobbit feet on a regular basis.


Seriously, I had to get out the big sketchbook to even trace around them. I know people with larger feet than mine and I tell you now I don't want to make shoes for any of them.

The lastmakers weren't a proper guild in their own right, so I'll be going through this pretty fast and hopefully we'll get it in one. Essentially I'll be using a lifetime of carving experience to sculpt something approximating my foot. Then I'll do it again with the other foot.
Deviation(s) from Period Techniques: Near as I can tell, the standard practice for last makers in the period is much the same as now. Hardwoods (preferably beech) are cut to a rough shape using something called a 'stock knife' which aren't easily obtained in the United States. A stock knife is a large blade with a handle on one end and a hook on the other. I'll append a video at the bottom of this post of an experienced clogmaker using one.
The hook is secured to an eyebolt in the table as a fulcrum to form a 2nd class lever. I couldn't find one and don't have the werewithal to make one, also I'll be using scraps of pine since this doesn't have to survive the ages, just the one project. If I like doing this and want to do it again, I'll make another out of a hardwood. In the meantime: pine.
Because my feet are deep and wide, I glued up a some chunks of 2 x 6 I had lying around and transferred my traced outline of my foot to the wood, trying to avoid knots and grain funkiness. Or at least use the grain funkiness to my advantage.


Step two of any carving project is to remove as much waste material as possible. The fastest and cleanest way to do this would be to cut it away with a band saw, but I don't own one. So the second best chance is to cut to the line and chop away the waste with a combination of chisels and coping saws.


It's hard to do this and take pictures at the same time and The Engineer was grouting the kitchen tiles, so forgive me if these look a bit staged. It's only because my hands aren't in the shot.


Having pared away as much of the waste as possible, only resorting to the chopsaw for the bit that crosses the knot at the little toe.  Chisels tend to glance off of knots or chunk them out completely to the detriment of carving as a whole.  A real last maker would choose a clear piece of hardwood, as I said, but we're working with what we have.


Now, more cuts to make the waste as small as possible before removing it with a smaller chisel...


Working in all three dimensions means more cuts and switching through a series of chisels and working top and bottom.  According to Francis, unlike modern lasts, period lasts tended to be flat-bottomed since heels hadn't really become a Thing yet.


At this point, it's time to switch to a gouge because it's easier to create and follow curves with a gouge than it is with a bench chisel...


Most of the waste is removed, time to get to the final shaping.


This is where I encountered a very modern conundrum. Because lastmaking is ancillary to the actual project and just this one had already eaten the heart out of a day, I was faced with another few hours of paring away at the last with a succession of knives and rasps, or I could use a machine.

My conscience got the better of me. In the end, I rasped away most of it until I's achieved something close the final shape and was starting to lose the light. Then I took it into the garage and chucked a drum sander into the drill press and finished the final shaping and sanding in one.


So... speed may kill, but it does save you from wasting more time than you have to.

Next: Do you know your left from your right? Did the Elizabethans?

~ Scott

----

Resources:
"Footwear of the Middle Ages" by Marc Carlson (Website) How historical shoes were made from the middle ages through the Tudors, working from primary sources and personal experience. Great site, lots of information.

"Handmade Shoes for Men" by Laszlo Vass and Magda Molnar (Book) Modern shoe making and some inaccurate history, but valuable information on measuring feet and fitting shoes.

"Stepping Through Time: Archeological Footwear from Prehistoric Times Until 1800" by Olaf Goubitz (Book) Just what it says on the tin. Francis swears by this book. I haven't acquired a copy yet, but I'm working on it.

"Chopine, Zoccolo, and Other Raised and High Heel Construction" by Francis Classe (Website) I hesitate to risk the pun, but Francis is a class act and a generous scholar of historical footwear and how it was made. Visit his site and his blog to see this done right, thoroughly, and well.


Sunday, September 1, 2013

Shoemakers and Tailors: Because naked people have little or no influence on society...

Mark Twain said "Clothes make the man. Naked people have little or no influence on society."  Which brings us to the next parcel of research in our quest.

Before this project even began, I was already thinking about what I would wear and how I would make it and whether for the sake of authenticity I needed to wear a costume while I was about my monthly tasks. One year ago today, I was writing the words: "Going into this, I honestly did not give much thought to clothes. I am mostly known as a costumer, of course I was going to be doing most if not all of this garbed in the period manner. As much as possible and a bit more, please."

At the time, I fully intended to be dressed like the fellow in the engraving at right. This renaissance tradesman has always struck me as the iconic figure of the man of the period, standing ready to make a living by the calluses of his hands. I bought fabric and sat down to make the costume I would wear for each and every aspect of this year's project. I would put it on whenever I was going to be doing anything for this project.

If you've been following along, you'll already know that this turned out not to be true.

Seriously, though, Espresso Monkey tees are totally correct for the period. 
In the end, I decided that unless the clothing either changed the outcome in some manner, or unless the venue called for it, I was going to focus on the nuances of the trade and focus on creating and using the correct tools, wearing the correct and current safety equipment, and not get slowed down each night when I got home by changing into doublet and hose.

Don't forget that I am, as I often point out, not a reenactor. I'm not here to step into the life of a 16th century tradesman, I am here to study the lives of all 16th century tradesmen. Which isn't to say that I didn't make the costume...

Of course all period artisans spent their time leaning against trees with their tools scattered at their feet...
As previously noted, I didn't really try to become a tradesman in any real sense until my recent stint as the baker in the living history encampment of the local renaissance faire. If you've stuck around that long and were paying attention to those photos from the faire, I was wearing the costume created to match the bloke in the engraving.

Before I started this project about half the people who knew my work knew me primarily as a costumer. (The other half of my world thought of me only as an author; this is the first time I've made any effort to combine the two disparate halves of my life.)  Because I've been a costumer for going on twenty years, the Worshipful Company of Merchant Taylors (Tailors) seems a bit of a dawdle. Much as could be said for the Joiners and Carpenters.

This blog is not the place for dawdling.

Because costuming is something I'm already known for, "learning to sew" would ring just as false as pretending I'm learning joinery. (Google tells me that fully half of you got here by following the link on Garb for Guys, my costuming blog which has featured a good deal of my carpentry as well.) Even were that not the case, it doesn't matter because I'm not here to lie to you regardless.

Really, in the current bundle of projects, shoemaking is the only area where I know nothing going in, so at least there should be plenty of "Scottie is an idiot" moments for your amusement.

How will this work?

The Joiners, the Merchant Taylors, and the Cordwainers will be concurrent projects.  Remember when I said I had a plan to stack projects in a logical fashion? This is how it begins.

At the moment, I'm thinking a ground-up and skin-out demonstration of costume taken from around 1570 or so; the mid-point of Elizabeth's reign is a nice place to work. I've already been making enquiries in knowledgeable places for information on Elizabethan underwear (which is not a Google search term you want to use lightly; just trust me on this one). Meanwhile, I'll make some shoe lasts and knock out a pair of shoes (he said lightly as if the idea didn't scare him) and follow that with the drafting and execution of a pattern for men's and women's clothing from period sources and made from as close to period materials as I can reasonably acquire.

There's a surprising amount of woodworking involved in all of these projects, most especially hat-blocking and last making. Meanwhile, I shall also be finishing my joiner's toolbox and making a reproduction of an item of Elizabethan furniture yet-to-be-determined. Probably some sort of chair.

Joinery, sewing, and shoemaking is all work that must be done entirely by hand and it will probably continue and finish by late November if not early December. Updates will be posted as they warrant. These projects will be concurrent with and inform many of the other projects that will be taking place between now and the end of the year.

It's the ninth month of what I'd intended to be a 12-month project, so this is how things are starting to shape up going into the home stretch.

~ Scott

Friday, August 30, 2013

Doing Time in the Joint: Introducing the Worshipful Company of Joiners

I’ve heard any number of definitions that seek to draw a line between the joiner and the carpenter. Some people say the joiner is defined by his lack of nails. Others by the outcomes: the carpenter builds bridges and buildings while the joiner builds finer things. In an episode of the Woodwright’s Shop, Roy Underhill defines the joiner by his tools, saying he becomes a joiner the moment he picks up a jointer’s plane.

The Oxford English Dictionary takes the "Defined by his results" definition: "A craftsman whose occupation is to construct things by joining pieces of wood ; a worker in wood who does lighter and more ornamental work than that of a carpenter, as the construction of the furniture and fittings of a house, ship, etc." and dutifully notes that it first appears in print from 1386.

Back in May, my favorite woodworking blogger The Village Carpenter wrapped up her blog and signed off, but not before she added me to her blogroll under "Hand Tools Only". When she did this, I was unaware of it and I'm somewhat amused to note that looking back, I haven't done much woodworking since she did so.

One of the reasons you haven't seen many wood chips fly is that I've been remodeling my kitchen (using power tools, I confess). The other is that I've been doing research and acquiring a box of tools that are as near their period form as possible. As always, I get by with a little help from my friends and it never ceases to amaze me how many people have taken on this project as if it was their own.

I've had leads on tools emailed to me and received tools mailed to me from as far away as Georgia (thanks, Noel!) and the UK (thank you, Douglas!). As you probably know, some of them I've revived from the slumber of ages and some of them I inherited.

At this point I've acquired enough tools to begin building the rest of the tools I'll need and for that I shall need joinery.

I guess it's high time I earned that link. 

Well, it's a good start, anyway...

In the Joint, Part One

In the 16th century, there were many joints that did not rely on nails to hold together and it was the joiner whose specialty was the making and execution of those joints. The key joint, in my opinion, wasn't the dovetail so prized by modern cabinetmakers, but the mortise and tenon.

At its simplest definition, mortises are holes and tenons are slightly smaller bits sized to fit inside the holes.  The tenon is then usually held in place by pegs or nails or in the case of knockdown items like trestle tables, a removable key.


If you think about it, that seems a bit weak, but it isn't.  Houses and furniture that was built in the 16th century this manner are still standing today. A bit closer to home, I'm talked before about the 16th century wheelbarrow I made using mostly period joinery, the key joints being four through tenons that form the chassis.


See those two tenons that are sticking through the arms of the barrow above? Those are the tenons that lock the whole thing together. Even the wheel is held in place by those two framing members...


All those pieces in the picture above are held together and square by those four tenons. Until I had to repair the wheel a few years after this photo was taken, there were two nails in the entire thing. The only reason I used screws on the wheel is so I could change it more easily.

Eight years later it looks like this...


That sounds fine and I'll admit that it looks a bit ramshackle, but bear in mind that we're looking at a farm and garden tool that I made out of $25 worth of crap lumber from Home Depot and when I wasn't using it to haul sandbags and lumber, it was parked under a tree for eight years.

No matter how much I loaded the thing down, those tenons held tight.


The pins holding the tenons in place are known as "drawbore" pins, which means the holes are slightly offset and the pin is being yanked in two different directions, preventing it or the joint being held from moving.


This is one of the only two nails in the piece.  I didn't need them. Not sure why I bothered to use them. It's just that I was new at the drawbore tenon and didn't really trust myself yet.

Cutting a mortise

These days, a lucky woodworker with a decent machine cuts these with a mortising machine, which is a hollow square chisel that is dragged through the wood by an augur running through the hollow center. Most of the time these days, I remove the waste from the hole using a drill and then square the hole with a chisel.

We'll be doing this chopping it out with just a chisel.  Handily, this is the exact chisel my grandpa used to teach me how to do this thirty-odd years ago.


I really need to make a new leather washer for that chisel handle.

Draw your square with a knife or a mortising gauge and make a series of small lateral cuts... 


Then, go in at a slight angle and remove the waste between each lateral cut, working with a nice, sharp chisel and working slowly to keep your edges square.


Rinse and repeat, working as deep into the wood as you need to go. Not all tenons need be through-tenons and there are a dozen or so ways to stop them short and lock them in using wedges if you're not up to the drawbore technique.


Not all tenons are shouldered, which is what the parts of the timber on the sides of the tenon in the illustration above would be called. The mortises in the embroidery frame pictured below are the same size as the tenon pieces and are kept in place by the pegs in the frame and the tension of the embroidery. We'll see more of it when we pull thread with the Worshipful Company of Broderers.

I brought up the frame because it handily illustrates how everything made of wood in the 16th century at some point passed under the tools of the guilds of joiners and carpenters. Every embroidery frame, every box, every building. So this is going to be a big one...


Want to learn more about Drawbore Joinery?

Read this article at WK Fine Tools by cabinetmaker and Popular Woodworking contributing editor Christopher Schwarz:

Peter Follansbee deals extensively with the mechanics of the drawbore in his book "Make a Joint Stool from a Tree" published by Lost Art Press.

~ Scott

Tuesday, August 27, 2013

Kill It With Fire, Part Five: Cleaning the kitchens. . . summary and wrapup


"Cooking is a craft, I like to think, and a good cook is a craftsman -- not an artist. There's nothing wrong with that: the great cathedrals of Europe were built by craftsmen -- though not designed by them. Practicing your craft in expert fashion is noble, honorable and satisfying."

- Anthony Bourdain, Kitchen Confidential
No one begins something like this on a whim. And if I'm honest, the quote that started this insanity was just one of many pebbles that contributed to the avalanche. It might have been the first pebble, but I can hardly blame Mssr. Bourdain for all that followed...

I am tired. More tired than I have been in a long, long time. My new regimen of archery practice didn't help, and for my Elizabethan alter-ego, the invention of Advil is 390-odd years in the future.

Thankfully, I live in that future so I'm not reduced to gnawing on the trunk of the nearest willow tree.

I was an art major, which is a roundabout way of saying that I spent a lot of time working in restaurant kitchens. There wasn't much in Bourdain's book that really surprised me. Of all the oddball jobs I took through the 'starving artist years' that are so fondly spoken of by people who've never lived through them, the restaurant jobs were my favorites.

Was it noble, honorable, and satisfying, as he promised? I dunno. I wasn't a chef, the highest I ever got was prep cook. I certainly didn't make it to culinary school; I spent too much time as a dish dog, really. Nevertheless, the exposure to finer foods and the people who prepared them than I could afford on what they were paying me taught me to appreciate, to taste, food differently.

But this isn't a foodie blog any more than it's intended to be Scottie Goes to Ren Faire. I never really meant for the baking demonstrations at the Washington Midsummer's Renaissance Faire to change so drastically how I thought about this project.

I'm still slightly ashamed to admit that it didn't occur to me earlier to set up and attempt one of these trades at anything close to full production level.  How could I ever hope to understand the lives of my craftsmen forebears if I never stepped fully into their shoes?

We'll get to shoes soon, this is about... I almost said it's about bread. It's actually not at all about bread.  Anthony was right about that. It's about craft.


The WMRF demonstrations were always intended to be a sort of safety valve on this project. The faire was scheduled just past the midpoint in the project and I knew that by that time I'd have a fair idea whether or not I thought I'd make it by the end of December. (Though to be honest, I still don't know and you'll see why I've stacked projects as I have in the coming months.)

Like archery, baking was not something I ever thought to enjoy. In my home, I do all the cooking, but The Engineer did all the baking. Baking was too fussy for me, too much like science and not enough like art... or so I thought. It never occured to me that it would be baking that finally put me over to the noble, honorable, and satisfying side of the kitchens.


Those are The Engineer's hands in that photo above. It was also the first time in quite awhile that she and I cooked anything together. Until the recent remodel began, our kitchen was inhospitable to more than one person at a time.

There's finally room for craftsmanship. 

Photo & Digital Manipulation by Dan Hill - © 2013 Used with permission
By God, Tony was right about that. When Dan Hill posted that photo manip above, one of the first comments posted below it (by someone I have never met, mind you) was two words: "Naturally happy."

Bourdain spent the rest of Kitchen Confidential talking about how dog tired he got working the line, how strung out he was on various substances, how much the food business was a scam and how much was genuine, and how arduous the restaurant biz is is, but even now you can see in his shows how much he loved it.

I'm starting to feel that way about bread and baking.

Baking turned out to be more art than science, not as slavishly dedicated to the arcane formulae of moth-eaten texts as I once believed. When my hands were in the dough and our friend Becky had the ovens blazing and Kristin was scooping flour into the bowls while Becky's husband Douglas was working the rope line, charming the tourists with his English accent and well-rehearsed dialogue about the history of English baking... here was an element of jazz. 

And always the crowds lined up at the edge of our area, asking questions and carrying away my card or the address of this blog scribbled on a bit of paper. At one point, we scrawled a diagram and the URL for this project on a chalkboard and folks were taking photos of it with their phones.

I hope you found your way here without any trouble. I hope that you learned something that day at the faire when you stumbled across our mad adventure in the land of yeast and flour. God knows that we certainly did.

That Corgi was an excellent student...

The Oven's End...

The oven at the Washington Midsummer's Renaissance Faire site was never meant to last. Not only did we build it from the cheapest materials, we taxed them to their uttermost extremes. By the end of the last day of the fair, the cracks were no longer superficial. The ceiling and the framing around the door were beginning to deteriorate and I decided to bake a few final pies and call it a day.


We let the oven cool and went our separate ways to enjoy the fun and frivolity that we'd missed the other weekends of the faire due to tending our breads.  When the final cannon sounded the end of the faire, we gathered one last time around our hearth...

The Engineer had the honor of the first whack.


Then Becky and Douglas, who were so eager to leave they were already changed into civilian clothes...


Then it was left to me. It felt a little wrong, like putting down a family pet. It had stood us in good stead, generated far in excess of its capacity and kept going strong. But the heat and desolation of the days standing in front of it got the better of me and I let the hammer swing.


And soon it was all over.  It arrived at the faire site in buckets and would leave by the shovel full, loaded in the bed of my truck...


The final tally for our little wood-fired bakery: 220 loaves, eight pies, nine scones, two loaves of soda bread, and 1 apple tart, utilizing 1/2 bushel of apples, 80+ lbs of flour, and several gallons of ale. 

Thanks to my partners in floury crime: Kristin Perkins, Kelsey Fahy, and Becky & Douglas Norton. Thank you to Pat, Tracy, and Amy of the Washington Renaissance Arts & Entertainment Society (WRAES) and all the cast and crew of the Washington Midsummer Renaissance Faire.  I hope you enjoyed the bread we dispersed to your tables each day from our bakery.  Thank you to all the photographers that documented the events and kindly sent me their photographs and videos.

There is, as always a sense of melancholy as we end one thing, and a sense of hope as we embark on the next.
Stay tuned to this channel. I doubt this is the last time we will see the fruit of an oven such as this. I still have the one in my back yard, after all...

~ Scott